Extending the Sitecore Identity Service with Plugins
Sitecore Identity
Sitecore Identity (SI) is a mechanism to log in to Sitecore. It builds on the Federated Authentication functionality and the Sitecore Identity server, which is based on Duende IdentityServer. It provides a separate identity provider, and allows you to set up SSO (Single Sign-On) across Sitecore services and applications.
-Sitecore Documentation
It is rather very easy to customize something on the CM/CD roles, as we have various pipelines offered by Sitecore where we can add our custom part. However, it is slightly difficult to do something like that for the Sitecore Identity Server.
To customize something on the ID role, we would need to build Custom Identity Service Plugins, which will run on the Identity Service.
In this post, I explain the steps to build a Custom Identity Service Plugin, and how to configure the plugin for the Sitecore Identity Server.
Steps to build a Custom Identity Service Plugin
In the below example, I will be building a plugin to add custom security headers to the Identity Service.
Open your Sitecore solution on Visual Studio.
You can create a new folder to store your IdentityServerPlugins, if you are following the Helix pattern, or use the Foundation layer.
Create a Class Library project with the .NET Standard 2.0 framework.
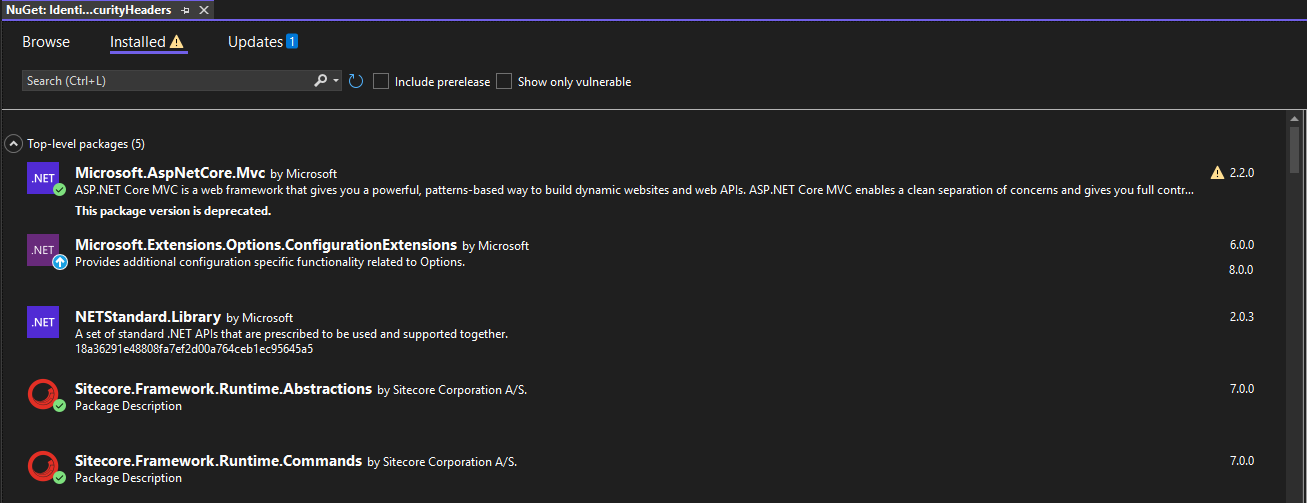
Add the following NuGet packages.
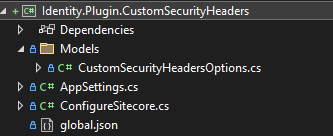
Create the below structure in your project.
In the global.json file, add the below content. The version used here shows the version of the plugin, which we will be using later.
{
  "msbuild-sdks": {
    "Sitecore.Framework.Runtime.Build": "1.0.0"
  }
}
Under the Models folder, create your model class, which will have a mapping of the configuration file you will be passing to the Sitecore Identity Server. In my case, it will look as below.
namespace Identity.Plugin.CustomSecurityHeaders.Models
{
    public class CustomSecurityHeadersOptions
    {
        public string XFrameOptions { get; set; }
        public string XXssProtection { get; set; }
        public string StrictTransportSecurity { get; set; }
    }
}
In the AppSettings.cs, we will add a class that initializes the configuration. The section name indicates the configuration structure, in which we will pass the configuration details.
using Identity.Plugin.CustomSecurityHeaders.Models;

namespace Identity.Plugin.CustomSecurityHeaders
{
    public class AppSettings
    {
        public static readonly string SectionName = "Sitecore:IdentityServer:CustomSecurityHeaders";
        public CustomSecurityHeadersOptions CustomSecurityHeadersOptions = new CustomSecurityHeadersOptions();
    }
}
In the ConfigureSitecore.cs, we will add a class which will configure what we want to perform in the plugin.
using Microsoft.Extensions.Configuration;
using Microsoft.Extensions.DependencyInjection;
using Microsoft.Extensions.Logging;
using Identity.Plugin.CustomSecurityHeaders.Models;
using Sitecore.Framework.Runtime.Configuration;

namespace Identity.Plugin.CustomSecurityHeaders
{
    public class ConfigureSitecore
    {
        private readonly ILogger<ConfigureSitecore> _logger;
        private readonly AppSettings _appSettings;
        private readonly IConfigurationSection _configurationSection;

        public ConfigureSitecore(ISitecoreConfiguration scConfig, ILogger<ConfigureSitecore> logger)
        {
            _logger = logger;
            _appSettings = new AppSettings();
            _configurationSection = scConfig.GetSection(AppSettings.SectionName);
            scConfig.GetSection(AppSettings.SectionName).Bind(_appSettings.CustomSecurityHeadersOptions);
        }
        public void ConfigureServices(IServiceCollection services)
        {
            services.Configure<CustomSecurityHeadersOptions>(_configurationSection);
            /*
            Add more of your logic here
            */
        }
    }
}
Build the project, and make sure that the build is successful.
Steps to add the Custom Identity Service Plugin to your Sitecore Identity Server
Create the below structure in your Identity Service project.
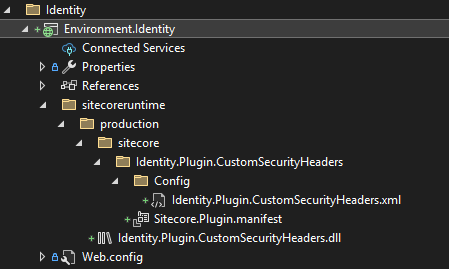
NOTE: Make sure that the folder structure mentioned is exactly followed. Otherwise, it will not work.
The Identity.Plugin.CustomSecurityHeaders.xml file will be the config file, where we will define the configuration. The structure for the configuration should be the same as what we defined in the AppSettings file of the plugin.
<?xml version="1.0" encoding="utf-8"?>
<Settings>
	<Sitecore>
		<IdentityServer>
			<CustomSecurityHeaders>
				<XFrameOptions>default</XFrameOptions>
				<XXssProtection>1</XXssProtection>
				<StrictTransportSecurity>max-age=50000000</StrictTransportSecurity>
			</CustomSecurityHeaders>
		</IdentityServer>
	</Sitecore>
</Settings>
The Sitecore.Plugin.manifest file will define the plugin. The Version here should be the same as what we defined in the global.json file of the plugin.
<?xml version="1.0" encoding="utf-8"?>
<SitecorePlugin PluginName="Identity.Plugin.CustomSecurityHeaders" AssemblyName="Identity.Plugin.CustomSecurityHeaders" Version="1.0.0">
  <Dependencies />
  <Tags>
  </Tags>
  <EnvironmentVariablePrefixes />
</SitecorePlugin>
Copy the DLL file generated on build of the plugin project: Identity.Plugin.CustomSecurityHeaders.dll. This can also be automated as per your setup.
You can add a step in the DockerFile to copy the DLL.
Add an xcopy step in the Post-build event to copy the DLL file.
After this, build and deploy your Identity project to your Identity Server. Now, you should be able to run the plugin. You can also attach and debug the Identity Service to confirm that your plugin works.
If you have any questions/feedback. Please add them in the comments.
Happy Sitecoring!